
Running unit tests as part of the build process with Visual Studio Online requires no effort if you use Visual Studio Unit Testing Framework. But really, not a lot use that these days. I have done a few presentations on using the build services in Visual Studio Online for Continuous Integration. Unfortunately it seems common that it is a bit troublesome to run either xUnit or NUnit tests as part of the build process. Here are the few steps that enables either xUnit or NUnit with VSO Build (the new version!).
Do the following in your Visual Studio Solution:
- Install the unit test framework NuGet package of choice (xunit or NUnit).
- Install the matching Visual Studio test adapter/runner NuGet package. This provides the binaries that will enable e.g. xUnit unit tests to be run with the Visual Studio test runner, that is used on the VSO build servers. For xUnit the package is
xunit.runner.visualstudioand for NUnit the package isNUnitTestAdapter. - Make note of your packages folder where NuGet packages are restored to (usually this is in something like
/**/packages.
Next, go to VSO Build, and edit the build definition as follows:
- Select the existing Visual Studio Test build step or add a new one.
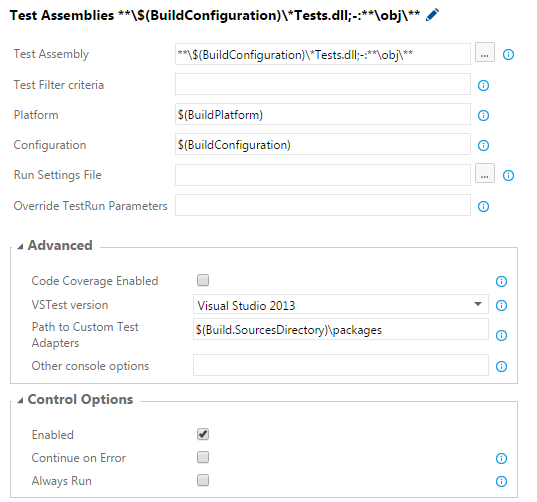
- Make sure the Test Assembly matches the assemblies containing your tests. Note that the default configuration of step matches
*test*.dllwhich will also match the xunit test runner NuGet package and will cause a warning since it will try and find unit tests in the xunit assembly. Try and choose a different pattern that will not match the xunit test runner assembly. - (This is the key part) In “Path to Custom Test Adapters” enter the location of where NuGet packages are restored to. You can access the root of where the repository is cloned to on the build server using the variable
$(Build.SourcesDirectory). If your packages folder is in the root of the repository, the field should be$(Build.SourcesDirectory)\packages.
Here is an example of how I configured the step:
Queue a build and you should now see in the logs that the test step executes with the Test Adapter Path specified:
2015-06-19T03:00:57.6853991Z Executing C:\Program Files (x86)\Microsoft Visual Studio 12.0\
Common7\IDE\CommonExtensions\Microsoft\TestWindow\vstest.console.exe
"C:\a\3b563038\App\App.Tests\bin\Debug\App.Tests.dll"
/TestAdapterPath:C:\a\3b563038\App\packages /logger:trx

2015-06-19T03:00:58.4562317Z Microsoft (R) Test Execution Command Line Tool Version 12.0.30723.0
2015-06-19T03:00:58.4562317Z Copyright (c) Microsoft Corporation.  All rights reserved.
2015-06-19T03:01:00.5585377Z Starting test execution, please wait...
2015-06-19T03:01:05.2303526Z Passed   App.Tests.MyTests.OnePlusOneShouldEqualTwo
2015-06-19T03:01:05.3397316Z Results File: C:\a\3b563038\TestResults\buildguest_TASKAGENT-0010 2015-06-19 03_01_03.trx
2015-06-19T03:01:05.3553566Z Total tests: 1. Passed: 1. Failed: 0. Skipped: 0.
2015-06-19T03:01:05.3553566Z Test Run Successful.
2015-06-19T03:01:05.3553566Z Test execution time: 2.4688 Seconds
2015-06-19T03:01:05.4923976Z Publishing Test Results...