ASP.NET 5 is on it’s way which will level the playing field a bit in comparison with other web stacks, primarily enabled through the integration of Node.js with Visual Studio. Exciting times indeed! In the project templates provided with the currently available Visual Studio 2015 CTP, the “non-empty” projects are configured with Grunt and Bower. In this post I will walk through setting up an empty solution with Bower and Gulp, an alternative to Grunt. The goal is to demonstrate how all the new possibilities are actually wired up in an ASP.NET 5 solution and show how you might replace Grunt with Gulp as task runner instead.
Grunt, Gulp, Bower, Node.js 101
Before we get started, let us quickly review what all these things are and why it makes ASP.NET 5 interesting. If you have been focused on the .NET world, chances are that you only briefly heard about some of these technologies.
Node.js is the ability to run JavaScript on the server. It is based on Googles V8 JavaScript engine used in Chrome, and long story short, it enables the execution of JavaScript applications on your computer – and lots of these are being created! As part of Node.js, there is also a package manager, npm, that can be used to get these applications, similar to NuGet. And you might have guessed it, Grunt, Gulp and Bower are examples of such applications.
Bower is a node program that provides an additional package manager with focus on the front-end. It allows you to manage jQuery, Bootstrap etc. as packages in your projects.
Grunt and Gulp are task runners that enables you to automate things. As previously stated, the non-empty ASP.NET 5 template uses Grunt, but for the sake of illustrating how it is all wired up, we will use Gulp in this example instead.
The (Almost) Empty ASP.NET 5 Solution
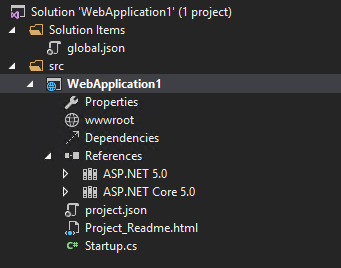
Creating an empty solution generates the following not-completely-empty solution:

The project.json file defines things like project dependencies (such as NuGet packages), runtime settings. New to ASP.NET 5 are the DNVM (previously called KVM) and DNX (previously KRE). These tools also use the project.json file. Think of the project.json as an improved Web Config file.
The Startup.cs class is the entry point for initializing the HTTP pipeline and services used, based on the OWIN specification. Think of the Startup.cs as the new place instead of Global.asax (although they are very different).
Setting up MVC
To have something to work with later, let us start out by setting up a minimal MVC site. Add the MVC package to dependencies in project.json so that it looks similar to the following:
"dependencies": {
    "Microsoft.AspNet.Server.IIS": "1.0.0-beta3",
    "Microsoft.AspNet.Mvc": "6.0.0-beta3"
},
Enable MVC in the Startup class:
public void ConfigureServices(IServiceCollection services)
{
    services.AddMvc();
}

public void Configure(IApplicationBuilder app)
{
    app.UseMvc();
}
Finally, create a “Controllers” folder in the solution and add a minimal controller class:
public class HomeController : Controller
{
    // GET: /<controller>/
    public IActionResult Index()
    {
        return Content("Hello from ASP.NET 5");
    }
}
With these few changes we now have a small MVC solution up and running. Let us get started with some of the new frontend tooling capabilities.
Setting up NPM
We will first set up the project to be a Node.js package, which can be used to specify which Node.js packages should be used in the project and installed with NPM. This is similar to the project.json file and defining the used NuGet package dependencies. Node.js expects a package.json file in the root. You can create this manually or through the node command line. If you have Visual Studio 2015 installed, the commands node and npm should be available in a command prompt.
You can create it with the npm command by opening a command prompt in the directory containing the source files (Src\SolutionName), and type “npm init”. You may encounter the following error: Error: ENOENT, stat ‘C:\Users[username]\AppData\Roaming\npm.
In this case, hit WIN+R and enter %APPDATA%. Create a folder named “npm” and run the command again. NPM will take you through a guide to set up the package.json file – just stick with the default values.
Alternatively, create the file package.json in the source folder, at the same level as Startup.cs and project.json with just the following (there is also a template available in the Add new item dialog):
{
    "name": "WebApplication1",
    "version": "1.0.0",
    "devDependencies": { }
}
If you generated the package.json file with the npm init command, add the devDependencies key. The devDependencies is used to specify any node packages used in the development (e.g. bower and Gulp that we will use later).
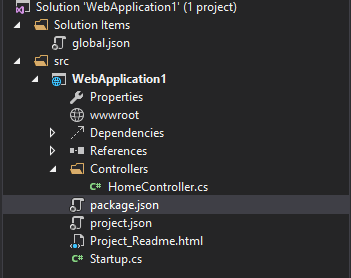
Because in ASP.NET 5 the solution explorer is simply a listing of the files in the solution directory, the package.json file should automatically show up:

With the package.json file, npm is now set up for the solution. The tooling in Visual Studio will monitor it for changes, and if we add bower or Gulp to devDependencies, it will automatically run the npm command necessary to download the node package(s). Let us do that next.
Installing Gulp, Bower (+ Some Bower Packages)
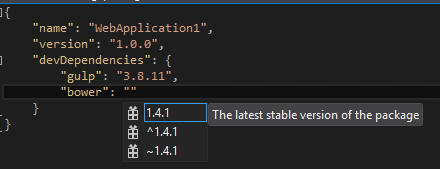
In the package.json file, under devDependencies, add bower, gulp and gulp-bower (we will use this to automate installation of bower packages):

Shortly after you should see the packages listed under “Dependencies” in the solution explorer. Dependencies contains all packages retrieved from other package manager, and “References” contains NuGet packages and class libraries.
We will also need Gulp to be globally available and in the command prompt, so run the following command in a command prompt to install Gulp globally: npm install -g gulp
Similar to package.json and project.json, Bower uses the file bower.json to define packages. This time, add it by right clicking the project – choose Add -> New Item. Select “Bower JSON configuration file”. Add a package like jQuery to dependencies and you should end up with a bower.json file containing the following:
{
    "name": "WebApplication1",
    "private": true,
    "dependencies": {
        "jquery": "2.1.3"
    },
    "exportsOverride": { }
}
Setting up Gulp Task to Install Bower Packages
In the next step we now make use of Gulp as a task runner to kick off the Bower package restore. Gulp looks for the file gulpfile.js. Create a gulpfile.js in the root and enter the following to register a task that kicks off bower and installs bower packages into a lib folder in wwwroot:
var gulp = require('gulp');
var bower = require('gulp-bower');

gulp.task('bower', function () {
    return bower()
           .pipe(gulp.dest('wwwroot/lib/'))
});
Note that, with bower, packages are basically a clone of the git repo for that package, and unfortunately everything is installed to the destination with gulp, whereas grunt can use filters defined in exportsOverride of bower.json. There are ways to handle this with gulp, but I consider this out of scope for this post.
In the command prompt, you can now run the bower task with the command gulp bower. If the gulp command cannot be found, you will need to add the following to the PATH system environment variable: %APPDATA%\npm. This will install the bower package(s) to the lib folder in wwwroot, making it usable in your web application.
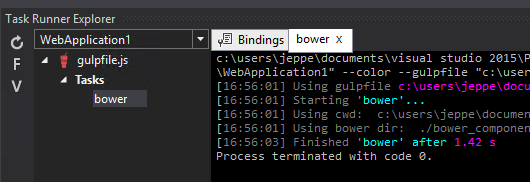
You can also run the bower task using the task runner explorer:

End-To-End Configuration for Cross-Platform Development
As previously stated, Visual Studio 2015 monitors the different package managers and automatically restores and installs new packages as you modify the package manager configuration files. But what if you are not using Visual Studio, or you are cloning the solution to a different environment to try it out on e.g. a Linux server. This is where the new package manager for ASP.NET will help.
Available as part of ASP.NET 5, is DNX Utility (dnu) – previously called KPM during the previews. When you run the restore command with dnu it will look at your project.json file and download the necessary dependencies. But it would be nice if this did a complete end-to-end restore, so that all NPM packages would also be restored, followed by bower packages and so on. Luckily we have some options to hook into the different stages of DNU and trigger additional commands.
In the package.json file you can use “scripts” to define what scripts should be executed at the different stages. These are listed on the official wiki. At the time of writing, this does not seem to have been finalized, so the listed stages are different from what is available as part of VS 2015 CTP 6.
Let us define that:
- when dnu is finished restoring NuGet packages, it should run npm install that will install all the Node.js packages defined in package.json, run bower install to restore all bower packages in bower.json.
- when npm install is finished, run the gulp bower command to install bower packages into the wwwroot/lib folder.
Add the following to the project.json file to enable these actions:
"scripts": {
    "postrestore": [ "npm install", "bower install" ],
    "prepare": [ "gulp bower" ]
}
With this, you are able to take your solution to other environments, fire off a restore command with the new package manager and the rest will be taken care of.