npm install -g for .NET? it’s here!
There is a (somewhat) hidden gem in the new .NET world with DNVM, DNX and DNU - creating and distributing global tools with ease. Global meaning the application is always available through one or more commands in the command prompt (basically being registered in the PATH system variable). In the Node.js community this has been a central part, allowing you to install useful tools using the Node Package Manager. “Secret Manager”, part of ASP.NET 5, is an example of such a tool in the .NET world - but it is also one of the only examples currently available. Here is how simple it is to get started with it:
# Downloads the Microsoft.Framework.SecretManager NuGet package and registers its commands
C:> dnu commands install Microsoft.Framework.SecretManager

# This command is now available
C:> user-secret
There is a section in the official ASP.NET 5 documentation on this, but at this point it is a bit toned down.
In this article we will look at how to make such a tool by creating a “Project Stats” tool that generates filetype and SLOC information. It will be installed by issuing the command:
C:> dnu commands install Tools.ProjectStats
and it will support the following types of usage:
C:\ProjectDir> project-stats -h # Prints a help description

C:\ProjectDir> project-stats files # Shows number of files and filetypes

C:\Temp> project-stats files -p C:\ProjectDir\ # Shows number of files and filetypes with a project directory option

C:\ProjectDir> project-stats sloc # Shows total SLOC for all files

C:\ProjectDir> project-stats sloc .cs .json # Shows total SLOC for all files with the extension .cs or .json
Before continuing, create a new Console Application (Package) solution (placed under Web in the New Project dialog) and name the solution Tools.ProjectStats.
I have pushed my implementation to GitHub for reference. You can find it on https://github.com/jlandersen/dnx-project-stats-application.
Running Project Commands with DNX
The Secret Manager is nothing more than a console application created as a DNX project, meaning there is a project.json file. If you create a new project using one of the templates (either a web app or a console application) you will find a “commands” section in the project.json file. The following is from a new web project:
  "commands": {
    "web": "Microsoft.AspNet.Server.Kestrel"
  }
The commands are what DNX will run when we want to start the application. So in this case, we can navigate to the project directory and issue the following to start the web application:
C:\Projects\WebApplication> dnx web
If you create a console application, the command value should be the namespace that contains your Main method.
For the Project Stats application, let us define the following in the project.json file:
  "commands": {
    "project-stats": "Tools.ProjectStats"
  }
With this we can run dnx project-stats in the project directory to run and test the application during development.
When Commands Become Global
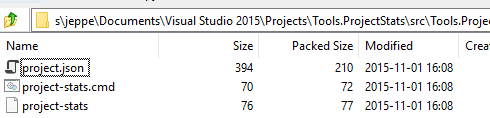
Before going into detail on how the command becomes global with DNU, it is nice to see what happens when building the application as a NuGet package. Open a command prompt, navigate to the project directory and type dnu pack. A bin folder is created where the .nupkg will be placed. Opening this with a tool such as 7-Zip you can see the contents, which includes an app folder and this will contain a batch file (.cmd) and a shell script for each command (in this case one):
 The contents of these scripts will basically run DNX with your program. By now you might have guessed it - when running dnu commands install on a Windows machine, the .cmd file is basically copied to a directory that is in the PATH system variable.
On Windows, this directory is C:\Users\[username]\.dnx\bin
If you install the SecretManager application, this folder will look as follows:
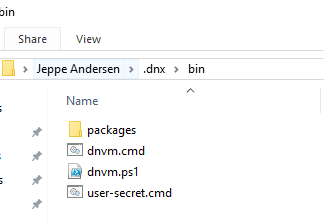
And that is basically what makes user-secret available in the command prompt globally.
Creating Tools with Ease Using Microsoft.Extensions.CommandLineUtils
The development team working on ASP.NET has created a neat little library called CommandLineUtils, which hopefully ends up in the official NuGet feed. Using this is not required for developing and distributing a command line tool - it can easily be done with your own vanilla console application.
For now it is available in their development feed. Open the NuGet.config file in the solution and add the new feed so that it looks as follows:
<configuration>
  <packageSources>
    <!--To inherit the global NuGet package sources remove the <clear/> line below -->
    <clear />
    <add key="api.nuget.org" value="https://api.nuget.org/v3/index.json" />
    <add key="asp-net-vnext" value="https://www.myget.org/F/aspnetvnext/api/v3/index.json" />
  </packageSources>
</configuration>
Add the dependency to the project.json file so that it looks like:
  "dependencies": {
    "Microsoft.Extensions.CommandLineUtils.Sources": {
      "version": "1.0.0-*",
      "type": "build"
    }
  }
Setting the type to build will compile this into the project.
The CommandLineUtils contains some handy types for creating a command line tool. Here is how setting up the “files” and “sloc” commands would look:
   public int Main(string[] args)
        {
            try
            {
                var app = new CommandLineApplication();
                app.Name = "project-stats";
                app.FullName = "Project Stats";
                app.Description = "Shows stats about a project such as number of files and SLOC";
                app.ShortVersionGetter = () => "1.0.0";
                app.HelpOption("-h");

                app.Command("files", c =>
                {
                    c.Description = "Gets stats about filetypes";

                    var optionProject = c.Option(
                                          "-p|--project <PATH>",
                                          "Path to the project, default is current directory",
                                          CommandOptionType.SingleValue);

                    c.HelpOption("-h");

                    c.OnExecute(() =>
                    {
                        var projectPath = optionProject.Value() ?? Directory.GetCurrentDirectory();
                        // TODO: Handle the files command
                    });
                });

                // Do the same for the sloc command

                return app.Execute(args);
            }
            catch (Exception)
            {
                return 0;
            }
        }
Distributing the Tool
Once you are done creating the tool, build a release NuGet package using the command dnu pack --configuration release and upload the .nupkg file to a NuGet feed of your choice. When the package is uploaded you can install it on any machine that has access to the feed using dnu commands install [packageId].
If you want to test it with your own feed, you can get started quickly using myget. Remember, if you are distributing the tool to the non-official NuGet.org feed, you will need to add the feed url to the global NuGet config file that is placed in C:\Users[User]\AppData\Roaming\NuGet.