The goal of this article is to describe a fast way to get started with creating an end-to-end continuous deployment setup with Visual Studio Team Services and Azure. With few resources and in little time you should be able to get a full setup going that deploys a web application to Azure without any downtime for users.
The article is split into three parts. This first part will provide a brief overview of the practices applied and services used in the setup. The remaining two parts will go into the details of setting it up. The parts are outlined as follows:
- Part One (this): Deployment with no downtime, Continuous Deployment, Visual Studio Team Services, Azure and how it all fits together
- Part Two: Setting up a build environment
- Part Three: Continuous blue-green deployment to Azure
Continuous Deployment
If you are not already doing Continuous Deployment, you should consider making this the goal for your organisation. The topic is not a new one. You can find many resources on this, including the difference between Continous Deployment and Continuous Delivery.
What I am talking about in this article is deploying to production automatically after committing code. Of course this also requires you to be able to do this with confidence, so it forces you to invest more in automated testing. The following overview should give an idea of what is involved in this setup. Depending on your scenario you may have different stages between committing code and deploying to production.
 Long story short - this practice reduces time to resolve issues, development time and empowers development teams in many ways to achieve more. Some platforms make this practice impossible or not very attractive. Mobile applications that must go through a review process or desktop applications that require the user to download and install a new version are not very suitable for this practice. Continuous Delivery is probably more suitable for you in these scenarios. On the other hand, if you are working on a web application, this is where you want to be! As a result, you could be deploying updates several times a day. This requires some thought into how to handle this from the perspective of the user. Deploying 10-12 times a day is not going to work if the application is inaccessible to the user every time you make a deployment. Deployment should be done without downtime.
Eliminating Downtime During Deployment
At momondo we always make deployments without downtime - every second we are not available has consequences. Besides the obvious consequence of loosing revenue, it is always frustrating as a user to get a “we are down for maintenance” page thrown in your face when you are about to use that one application you need in that particular moment. And if you do deploy several times every day, then you need to make sure the user is oblivious to this is going on.
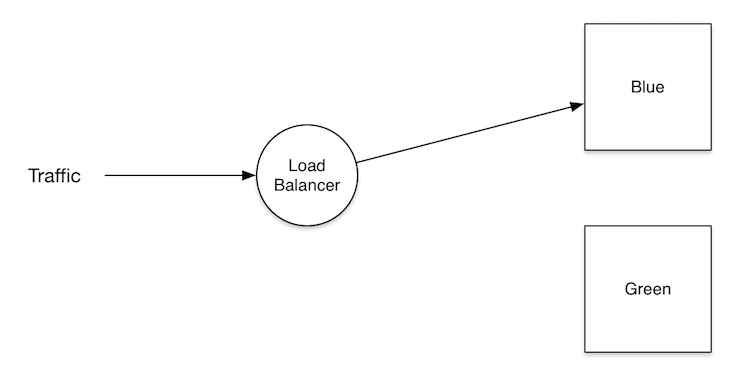
You can find several approaches to handle deployment with no downtime. A popular approach is Blue-Green Deployment. The idea is to have two environments going, blue and green, and have a load balancer or router sit in front that directs traffic to the active environment. Deploying a new version is done to the inactive environment. When ready, the load balancer is updated to direct traffic to the inactive environment.
 This is a well established approach, but requires some scripting to get it all automated. Let us see how Visual Studio Team Services and Azure Web Apps can help achieve this with minimal effort!
Where Visual Studio Team Services and Azure Web Apps Fits In
Visual Studio Team Services (VSTS) and Azure Web Apps provides a number of features that can help you host a web application, and build a continuous deployment pipeline around this with little work on the automation. In part two and three of this article we will build the following setup:

Let us try and map where VSTS and Azure Web Apps fits in this pipeline:

Three services in VSTS is used in the setup - hosted Git repository, Build and Release Management. All code goes into the Git repository. When code is committed VSTS Build will pick up the changes, build the solution and run unit tests. If everything goes well, Release Management picks up the package and deploys it to a test environment hosted as Azure Web App. Further tests can be run here to make sure the package is solid. Once complete, Release Management makes the deployment to a production environment. As part of this, it will handle what is essentially a Blue-Green deployment in collaboration with Azure Web Apps.
From the looks of it, Azure Web Apps is used only for hosting, but there are some features that makes all of this fit nicely with VSTS Release Management. A key feature is the concept of deployment slots. With this, you can deploy to other slots in the same web app. You are essentially given multiple web apps inside a single web app (e.g. one for blue and green). Azure can then perform a swap between slots, so that the url for a given slot ends up pointing to another slot. This is essentially what we would otherwise script our way out of in the Blue-Green scenario where a load balancer needs to be updated manually.
In the next parts we hop into the details of getting this setup up and running.